Imagine walking into a room that automatically adjusts its temperature and humidity to your comfort level—no apps, no manual adjustments, just seamless automation. Sounds futuristic? Not anymore. With the powerful yet affordable ESP32C6 microcontroller, you can build your own smart home sensor in as little as 10 minutes. Whether you’re a seasoned tinkerer or a curious beginner, this DIY project offers a rare combination of simplicity, cost-effectiveness, and innovative functionality. Why settle for off-the-shelf devices that compromise on privacy and customization when you can create a sensor tailored to your exact needs?
In this hands-on guide, you’ll discover how to transform a few basic components into a fully functional temperature and humidity sensor that integrates effortlessly with Home Assistant, the popular open-source home automation platform. From assembling the hardware to configuring the software with ESPHome, each step is designed to be beginner-friendly while offering enough flexibility to excite experienced makers. Along the way, you’ll also uncover how the ESP32C6’s support for multiple wireless protocols like Wi-Fi, Bluetooth, and Zigbee makes it a standout choice for DIY smart home projects. Ready to explore how a $1 microcontroller can transform your home automation setup? Let’s build something extraordinary.
DIY Smart Home Sensor Guide
TL;DR Key Takeaways:
- The ESP32C6 microcontroller is an affordable and versatile choice for DIY smart home projects, supporting multiple wireless protocols like Wi-Fi, Bluetooth, Zigbee, and Thread.
- Building a temperature and humidity sensor with the ESP32C6 and SHTC3 sensor is a cost-effective, beginner-friendly project that integrates seamlessly with Home Assistant.
- Hardware assembly involves connecting the ESP32C6 to the SHTC3 sensor using a breadboard and jumper wires, ensuring proper voltage regulation for safe operation.
- ESPHome simplifies software configuration, allowing users to flash firmware, customize sensor functionality, and integrate with Home Assistant for real-time data monitoring and automation.
- Optional upgrades, such as 3D-printed housing and enhanced data privacy, add functionality and personalization, making this project both practical and rewarding for smart home enthusiasts.
Why the ESP32C6 Microcontroller is Ideal
The ESP32C6 microcontroller stands out as an exceptional choice for DIY projects due to its combination of affordability and advanced features. Its compact design and low power consumption make it ideal for small-scale applications, such as smart home sensors. One of its key advantages is its support for multiple wireless protocols, including Wi-Fi, Bluetooth, Zigbee, and Thread. This ensures seamless compatibility with modern smart home ecosystems, allowing you to integrate it into your existing setup effortlessly.
At a price as low as $1, the ESP32C6 offers remarkable value without compromising on performance. Its versatility and reliability make it a go-to option for both beginners and seasoned makers looking to explore the world of microcontrollers.
What You’ll Need
To get started on this project, you’ll need the following components:
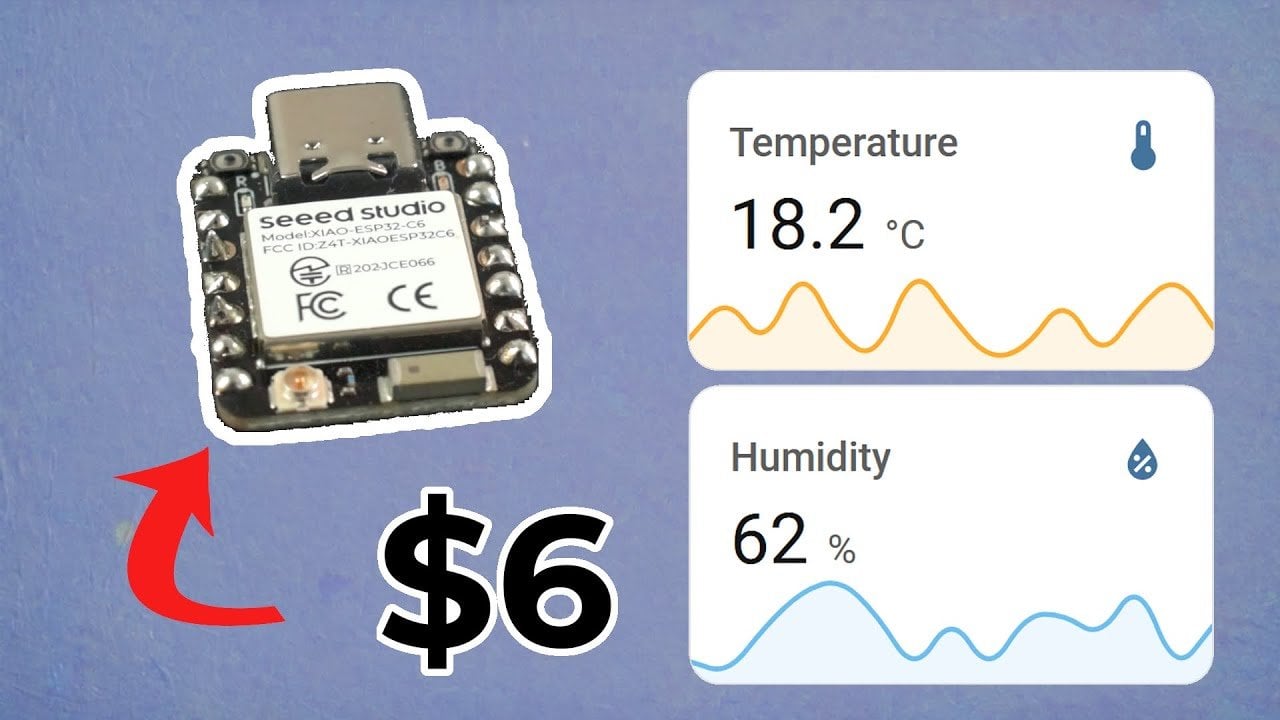
- Microcontroller: Xiao ESP32C6, known for its compact size and ease of use.
- Sensor: SHTC3, a highly accurate temperature and humidity sensor.
- Additional hardware: Breadboard, jumper wires, USB cable, and a compatible power source.
These components are widely available and budget-friendly. The SHTC3 sensor, in particular, is valued for its precision and responsiveness, ensuring reliable environmental data for your smart home system. With these tools, you’ll have everything you need to bring your project to life.
DIY ESP32 Smart Home Sensor Build
Learn more about smart home by reading our previous articles, guides, and features:
- Matter Smart Home Devices 2025: Features, Benefits & Challenges
- ChatGPT and Home Assistant: Affordable AI for Your Smart Home
- Apple Smart Home 2025: The Ultimate Beginner’s Guide
- How to Build a Custom Smart Home Control Panel in 2025
- Home Assistant vs Homey Pro: Smart Home Systems Compared
1: Assemble the Hardware
Begin by connecting the ESP32C6 microcontroller to the SHTC3 sensor. Use the labeled pins on both devices to establish connections for power, ground, and data transfer. It’s crucial to pay attention to voltage requirements, as most microcontrollers, including the ESP32C6, operate at 3.3V. Using a 5V power source without proper regulation can damage your components.
A breadboard and jumper wires are invaluable tools for this step, as they allow you to create a temporary circuit without the need for soldering. This setup is perfect for testing and prototyping, giving you the flexibility to make adjustments before finalizing your design.
2: Configure the Software with ESPHome
ESPHome is a powerful yet user-friendly framework designed for programming smart home devices. To configure your sensor, follow these steps:
- Download and install ESPHome on your computer.
- Create a configuration file that specifies your sensor’s functionality, Wi-Fi credentials, and integration settings for Home Assistant.
- Connect the ESP32C6 to your computer via USB and flash the firmware using ESPHome.
This process is straightforward and well-documented, making it accessible even for those new to programming. ESPHome simplifies the setup process, allowing you to focus on customizing your sensor’s features and functionality. Once configured, your sensor will be ready to communicate with your smart home system.
3: Integrate with Home Assistant
After flashing the firmware, the next step is to integrate your sensor with Home Assistant. The platform will automatically detect the device, allowing you to monitor temperature and humidity data in real-time. This data can be used to create automations that enhance your home’s comfort and efficiency, such as:
- Activating a dehumidifier when humidity levels exceed a certain threshold.
- Opening or closing blinds to regulate indoor temperature based on environmental conditions.
- Sending notifications to your phone when specific temperature or humidity levels are reached.
Home Assistant’s open-source nature allows for extensive customization, giving you the freedom to tailor the system to your specific needs. Whether you’re automating simple tasks or creating complex workflows, the possibilities are virtually endless.
Optional Upgrades
To further enhance your project, consider implementing these optional upgrades:
- 3D-Printed Housing: Design or download a 3D-printed case to protect your sensor and improve its aesthetic appeal.
- Data Privacy: By building your own sensor, you maintain full control over your data, offering greater privacy compared to commercial alternatives.
- Cost Savings: DIY solutions are often more affordable than purchasing pre-made devices, making this project a budget-friendly option.
These enhancements not only improve the functionality and appearance of your sensor but also add a personal touch to your project. They allow you to customize your device to better suit your preferences and needs.
Hands-On Learning and Practical Benefits
Building a smart home sensor with the ESP32C6 microcontroller is an engaging and educational experience. It combines affordability, functionality, and customization, making it an excellent project for beginners and experienced makers alike. By following this guide, you’ll gain valuable skills in working with microcontrollers, wireless connectivity, and smart home integration.
Whether you’re looking to enhance your home automation system or explore the world of DIY electronics, this project offers a practical and rewarding way to get started. With the ESP32C6 and a few simple components, you can create a device that not only improves your home’s functionality but also deepens your understanding of modern technology.
To deepen this topic, check our detailed analyses on Gadgets & Devices section.